“Hope for Africa”, a scratchboard portrait

Following along with my series of portraits from the school in Spitzkoppe in Namibia, I have my latest scratchboard of a gorgeous girl which I’ve titled “Hope for Africa”.

Firstly, what’s so special about Spitzkoppe? The tiny town is named after the rock under which it sits. We camped under the stars and woke up to this view

How magnificent is that!!!

Ok, to work. I’ve included a gif (an animation with a series of images rotating through) to show the different stages of the portrait, and I’ve also included some closeups to show the ‘feathering’ technique I’ve used. This technique involves scratching parallel lines, and then another set over them at a slightly different angle, and then more and more, each set at only a slightly different angle. This differs from ‘cross-hatching’ where your lines are often at 90° to each other. An example of feathering is shown below.

Now to the portrait itself

The gif which shows the work in progress

And some closeups

So if this is the first time you’ve seen scratchboard, below is a selection of the tools I use. I have described most of them elsewhere but I’ve only used two of them in this portrait. I’ve put the scalpel blade (extreme right) into the yellow handle for all of the ‘feathering’ as this blade can produce very fine lines and I’ve done the hair very quickly with the brass bristled brush (second from right).

I hope this has been of some use to someone out there.

Not so aggressive

Swans are known for being aggressive towards their own kind, other birds and also us humans. In fact, one in England, a ‘mute swan’, once bit me in my – ahem – “you know what” area and wouldn’t let go. Ouch!! Glad no one got a photo!!

I have a new scratchboard out of an Australian Black Swan coming right up to the viewer. It certainly looks like the viewer should beat a hasty retreat, but in reality, this was a very inquisitive and tame swan just checking my camera out. In fact, black swans are reputed to be even more agressive than mute swans and escaped ones in England are breeding and ousting mute swans from some areas. This one was on the banks of the River Torrens in Adelaide so at least it was where it should be. It and all the ones around were quite tame.

Coloured Scratchboard

In my last post I talked about the black scratchboard. I often end up colouring over the scratches but here’s a different concept where all the colour is going to be provided by the artist.

Here we have a Bornean Orangutan and I’ll show you some steps below.

Orangutan (4) finished

I used a small Ampersand Claybord for this. They come with white already sprayed on the surface of the underlying kaolin clay and unlike many brands, their white ink isn’t too shiny and can take colour in the form of coloured pencils. You could use inks or acrylic paints and even watercolours but I will say that acrylics can be added too thickly and make it difficult to scratch through, and watercolours can smear a bit when you put on another layer, so be careful.

After transferring my drawing to the board I waded in with coloured pencils just to get the feel of the piece.

Orangutan

I also added some black ink on the animal’s left cheek by using a fibre-tipped pen, and started scratching some of that out with a craft knife and continued this process below.

Orangutan (1)

We are going through what I call the ‘ugly’ stage here but it’s a case of just persevering with it, keep adding colour and keep scratching back, sometimes using a few layers. Always make certain you allow the area to dry before you scratch it again as the clay may come out in clumps (unless you wish to experiment for effect).

Orangutan (2)

I’ve started to try to deepen some of the colour by using watercolours. I could have used inks and Ampersand make very good ones.

Orangutan (3)

Scratching and colouring and scratching and colouring some more is the perfect way to build up layers and make fur or hair look real. This is where watercolour is ideal as they soak into the ink a tiny bit, but as soon as you scratch, you go through the colour to the white which means you can pick out highlights making some hairs appear on the surface while other hairs appear underneath.

And finally we have the finished scratchboard

Orangutan (4) finished

I hope this has been of help to you.

Scratchboard Art

I currently work in two different mediums, scratchboard and soft pastels. I’m wanting to add oils to this and also have a background in pen and ink, but in this post, I want to concentrate on scratchboards, what they are and how to do them.

If you are English, you’ll probably know them as Scraperboard but for now I’ll refer to them as scatchboards. In America, they drop the ‘a’ to scratchbord and possibly the best manufacturer is a company called Ampersand who have two products, the black ‘Scratchbord’ and the white ‘Claybord’. I’ll try to deal with ‘Scratchbord’ in this blog and ‘Claybord’ later.

Scratchboards (generic term) are manufactured by taking a hardboard sheet (like general hardware store MDF) and covering it in a fine layer of white kaolin clay, and then spraying that with ink, black in the case of ‘scratchbord’ and white in  ‘claybord’. You can use various tools to scratch the ink off to reveal the white clay, which you can colour with a variety of media.

Let’s start this demonstration with the black boards using these two pieces as examples.

“Watchful” 

Lion Zambia (Small)

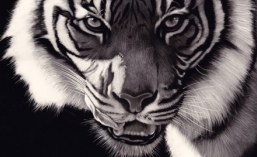
“The Elder Statesman”

African Man finished (Small)

I’ve used these two finished pieces to show that scratchboard can be used for all kinds of textures. They can even be used for landscapes or abstracts, so it’s a versatile medium.

I generally draw my design on a piece of paper the same size as the board I’m going to be using, and once I’m happy that all the elements are in the right place, compositionally and proportionally speaking, I transfer the drawing to the board with transfer or tracing paper.

For an example like my “Elder Statesman” above, I’ve used a craft knife and a fibreglass brush, both show below

Scratch tool

14259

These are the two tools I’ve used here but I’ve also used nail files, steel wool, sandpaper and brass brushes in other pieces.

The fibreglass brush has been used to quickly clear the black ink from the background. A serendipity here is that as I was doing it, I liked the halo effect I got so I left the background like that on purpose. I used the craft knife to scratch the ink away in a cross hatching style and then used the fibreglass brush to fade the ink away a bit, especially in the highlight areas. This is an earler shot and a closeup to show the effect I mean and you’ll be able to see the process around the chin.

African_Man003 (Small)

African_Man_mouth (Small)

Scratchboard is a particularly good medium for renduring hair or fur and for the lion, I’ve used the same tools in a slightly different way, always trying to scratch in the direction of the fur. This creates the illusion of hair and helps show the form of the animal’s structure under that hair. Here are a few images showing the progress of the piece and a couple of closeups showing the direction of the fur and how I’ve done the eyes with a ‘stippling’ technique which involves bouncing the tip of the knife on the board which flicks off a tiny piece of clay with each bounce.

Lion_01 (Small)

Lion_03 (Small)

Lion_03_mouth_crop (Small)

Lion_03_eye_crop (Small)

Back to the original image, I’ve created the swirls of fur in the shadow behind the head using the brush, following the fur direction carefully, and then washed some diluted black ink over the result to keep the shadows.

Lion Zambia (Small)

There are many ways to create texture with a knife. In the man above, I used the cross hatching technique but in the man and chimp below, I’ve used what I call my ‘squiggly’ technique where I scratch in a random fashion to create the highlights

“Abu”

Chimp Abu (Small)

“No Fish Today”

No Fish Today (Small)

Here’s a closeup to show you that ‘squiggly’ technique which can be quite effective when not magnified like this.

No_fish_today_eye (Small)

With my next post, I’ll tackle colouring the white boards (‘Claybord’)

I hope this has been of use to you.

My latest lion scratchboard

Whilst on a recent trip to Africa, I had the opportunity to go ‘walking with lions’. The company involved is trying to rehabilitate lions back into the wild. They’ve been decimated in recent years by human encroachment, a feline form of aids and the sickest of all, their ‘medicinal’ benefits. In 1980, not all that long ago, the African Lion population across the continent was reputed to number 230,000. Today it is in the region of 20,000 – less than 10% remaining. So it’s quite laudable that some not for profit organisations are trying to do something about the situation. I walked along with two ten month old females and was able to get plenty of reference material for my paintings and scratchboards.

Walking with Lions, Patrick (1) (Small)

What is scratchboard? You take a piece of card or board and spread a fine layer of white clay (kaolin) across it and then spray that with ink, generally black but it can be white which would mean you need to then colour it yourself. In this case, I’ve used one made by Ampersand. They are possibly the finest manufacturers of scratchboard materials in the world and they use boards made from MDF. This is perfect for me as they are so well finished, I don’t frame behind glass or mounts, but actually on top of the mount, slightly raised, which gives a unique look.

I’ve used a combination of scratching tools including a scalpel, a fibreglass brush and a brass brush and these can be seen below

IMAG0226

And here’s the lion

“Watchful”

Lion finished (Medium)