Tutorial – Stitching multiple images together easily

If your work is too big to scan and you don’t feel confident to photograph it and get a good result, what do you do? Well, obviously you can scan your art multiple times making certain each corner is scanned and any middle sections that the scanner didn’t reach. You now have multiple images so what do you do with these? I used to use “Gimp”, a free image manipulation program, and rotate the scans and stitch them together. Though I was quite quick at the process it was still fairly laborious and difficult to explain to anyone new to image manipulation. Microsoft Ice to the rescue.

Here’s an example of how to use this program.

As can be seen from the images below, I have simply pointed my camera out from my verandah and clicked away randomly. These are the images straight off my camera, shown in ‘Windows Explorer’

(Click on the images if you want to see them larger)

You will notice that, just for fun, I took one photograph upside down and two on their sides to show how well this program works.

Click this link.

You install the program from that link, then it asks you to install something else to make it work, and then you try to install it again and it asks you to install something else. Then you try for the third time and you finally have everything you need. This may be different on different computers but on my old thing, that’s what happened. Not to worry, no malicious stuff comes with it.

Open the program (“Microsoft Ice”), click “file/new panorama” and then navigate to your scans.

Highlight all your scans (in this case photographs) and hit ‘open’. As soon as you do this, it starts to solve the jigsaw puzzle. It shuffles everything into place for you, it rotates ones that are upside down or on their side (or more importantly it rotates by degree ones that are just a little off)

As you can see, my aiming was extremely random because the image below is not exactly well composed. I even missed a bit in the middle which would have really given the program a workout

Click “Export to Disk” and it will save a jpg of the image.

You can crop it in this program or in any of your other programs.

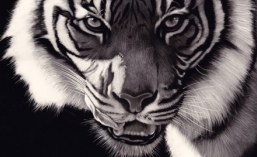
To make this more relevant than a silly panorama of my roof line, this tiger is too large for my scanner to do in one go so it is from four scans (each corner) and in just a few seconds, I had a perfectly stitched image. Thank you to the developers.

Tutorial – Photographing your artwork

This is a tutorial for those wishing to improve their skills in photographing their artwork.

We artists are often very good at the core process of creating art but sometimes we struggle with some of the peripheral jobs surrounding it. The first ones that spring to mind are marketing, paperwork and photographing our work so that we can catalogue it or enter it into galleries, shows and exhibitions. I have some tips for the last one.

Firstly, no matter what your level of development as an artist, get into the habit of photographing your work as you create it, thereby having lots of “Work In Progress” images. There are many reasons for this including being able to look back and chart your progress, putting your work on the internet in forums where you can get critiques, and even writing magazine articles showing how you create your art. I create separate folders on my computer for each series of WIP images named with the year it was created, the species and the title of the art (for example “2011 Zebras Lifeblood of Etosha”). This way, I can instantly find what I’m looking for.

Secondly, photographing your finished work is a fairly simple process as long as you follow some easy steps.

Set your work up (cleaned and free of blemishes) on an easel and your camera on a tripod to eliminate shake and blurring. I use the ‘self timer’ function so my hand doesn’t create any shake.

Have your camera pointed at your work at exactly 90 degrees with the camera positioned so it is aiming at the centre of the art. This will help eliminate any distortion of your image.

Have your camera positioned a little further away from your art and use the zoom slightly. This will further eliminate the distortion you get from wide angled lenses.

Frame your art well in the viewfinder. Get it nice and straight now even though this can be adjusted later on a computer.

Use natural lighting as much as possible. You will find your results will vary considerably depending on how you light your art. If you have the old tungsten lamps in your studio, your work will have a yellowish tinge when you photograph it. You can balance this out by adding fluorescent or the more modern mercury and halogen lights. However, nothing beats natural light for accurate representation of your work. Unless you are a very experienced photographer, do not use flash. Better to put your easel outside using natural, indirect light (not in the sunshine).

Make certain you shoot your work before you’ve framed it behind glass. If this is not possible, make certain there is as little glare or as few reflections as possible. You can further reduce distracting elements with a polarising filter.

Once you have your image on your camera and then loaded onto your computer, crop it so that there is no extraneous background showing. You can also rotate your work by degree to make certain it is absolutely straight.

Further editing on a computer
It is important to determine what you will be doing with the images of your finished artwork. If you are going to use them to produce prints, there is nothing wrong with trying to improve your work in an image editing program. This can be done by adjusting the contrast, brightness, colour balance and using various other tools that these programs offer.

However, if your goal is to enter your work into competitions, exhibitions and galleries, it is vital to resist the temptation to ‘improve’ your work by image editing. Your goal must absolutely be to represent your original artwork as accurately as possible. There is a very good reason for this. Let’s say you are entering your work into an exhibition. You may need to email your image to the organisers (many shows are like this nowadays) and the judges may then jury your work into the show. Once you’ve been accepted, the next step is to send your original piece to them. If this does not accurately match your digital image the judges may in fact reject your work.

Happy creating!

One Step Closer!

I’ve always wanted to do one of those large close up cat portraits that so many artists have done but I never had the right reference. I wanted to work from my own experiences and I finally got the perfect shot. This is Assiqua, a female Sumatran Tiger in our local (Adelaide) zoo and I caught her licking her lips as she looked at me. Note how the whiskers on her right are all pushed up by her tongue.

This is a 20″ x 16″ scratchboard and is created by using 80% fibreglass brush, 15% steel wool to get the backlit areas and 5% blade to get the whiskers and hairs at the edge. In reality there were no highlights in the eyes but I used artistic license to add more life. She is a magnificent animal and I really hoped to convey a sense of drama with her as if to say “You come one step closer and you’re mine”!

A couple of unexpected surprises

I entered four artworks into the Royal Adelaide Show’s art exhibition this year. I’ve been very lucky with this show in the past. I entered it in 1995, 2007 and 2010 and I won a category each time. This year I entered two works in the ‘pastel’ category and two in the ‘drawing’ category. It would have been nice to keep up my record of 100% success. Last night was the opening with a few big wigs doing speeches. In the past I’ve been rung up and informed I’d won so I would be there at the presentation. This year, no such phone call. I never expect to win so it wasn’t a disappointment but I did consider it my best showing ever. Anyway, Gaynor and I arrived and of course the first thing is we looked for my work among the 350 pieces and to confirm that, while there were ribbons on others, there were none on mine. Then we looked at the rest of the work and saw that the standard was incredibly high, which it usually is but this year, really awesome.

The funny thing was they had already put second place ribbons up but were holding first place ones back since they had a celebrity there doing the presentations. Hence, not seeing anything on mine, I settled back to enjoy the show thinking I hadn’t won anything. Then they announced me as a winner of one category which was amazing, so off I go to shake hands and get my award and then they ushered me off to get photographed for their website, but before I had even got to the photographer, blow me down I hear my name again in the next category and have to go back to shake hands again. So not only did I win the drawing category, I also won “pastels” which is huge for me since there is a massive pastel society which I’m not even in.

Check out the grin!

2012 Winner Drawing category Royal Adelaide Show

2012 Winner Pastels category Royal Adelaide Show

Some trips are pure gold for art

I was recently looking through my art (which is all carefully catalogued on my computer and in various other safe havens) and it struck me that my trip to Africa in 2009 was amazingly successful in generating ideas and references for my work. It was my sixth trip back home since I left at the age of fourteen but for some reason, this one made such an amazing impression that all this art poured out of me. One thing that definitely contributed was that this was the first time I had taken a really good digital SLR so not only could I keep clicking away, but I could also get in really close. I have compiled all of the pieces I’ve done from that one trip into the image below. It really is quite incredible how some travels affect you more than others and that trip was a corker!! It was through six different southern African Countries, seeing the most incredible sights. So here is a pictorial record of hundreds of hours at the desk or easel. The montage was thrown together pretty much willy-nilly but it gives an idea of how good that trip was. The scale of each image is not relative, some are much bigger than others in real life. There are three different mediums represented – scratchboard, pastels and oils.